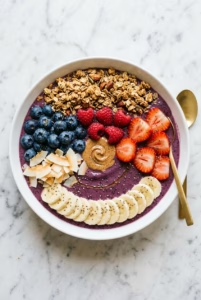
Thick, spoonable, and loaded with berries, this berry smoothie bowl eats more like a dessert you can justify at breakfast than a drink you have to rush through. The texture is the whole point: cold enough to feel refreshing, dense enough to hold a spoon upright, and sturdy enough to carry a proper pile of toppings without collapsing into soup.
The trick is starting with frozen fruit and no liquid at all. That sounds stubborn the first time you do it, but it keeps the blender from turning the base too loose. A small splash of almond milk only comes in at the end, and only if the blades stop moving completely. Açaí isn’t required, but it deepens the color and gives the bowl that rich, almost jammy flavor that makes the berries taste bigger.
Below, I’m walking through the texture cues that matter, the ingredient swaps that actually work, and the topping pattern I use when I want the bowl to look as good as it tastes.
The bowl stayed thick enough to eat with a spoon, and the honey, granola, and toasted coconut made it taste like a café breakfast. I added the milk one tablespoon at a time and it never turned runny.
Like this berry smoothie bowl? Save it to Pinterest for the mornings when you want a thick blended base, bright berry flavor, and a topping layout that looks polished in minutes.
The Blender Needs a Cold, Dry Start or the Bowl Slumps
The biggest mistake with smoothie bowls is adding too much liquid too soon. Once the berries start spinning freely in almond milk, you’re making a smoothie, not a bowl. Frozen fruit gives you the friction and body you need, and that thick mass is what lets the toppings sit on top instead of sinking.
Açaí helps with color and flavor, but it also contributes a denser, less icy texture than fruit alone. If you’re using powder instead of pulp, blend it in with the frozen fruit so it doesn’t leave little streaks. The goal here is a base that moves slowly in the blender, almost like soft-serve, not a pourable drink.
- Frozen mixed berries — These carry the flavor and the color. Mixed berries give you a brighter, less one-note bowl than using just strawberries or just blueberries.
- Frozen banana — This is the natural sweetener and the ingredient that makes the texture creamy without dairy. A fresh banana won’t thicken the bowl the same way.
- Açaí pulp or powder — Optional, but useful if you want a darker color and a deeper berry note. Pulp gives the best texture; powder is the easiest swap and still works well.
- Almond milk or coconut milk — This is only there to help a stalled blender. Coconut milk makes the bowl richer; almond milk keeps it lighter. Start with a tablespoon, not a splash.
- Honey or maple syrup — Use this only if your berries are tart. Frozen fruit can taste flatter than fresh fruit, and a small amount brings the flavor back into balance.
How to Blend It Thick Enough to Eat With a Spoon
Start With Frozen Fruit and No Liquid
Add the frozen berries, frozen banana, açaí, and honey to the blender first. Turn it on high and let the blades work through the mixture before reaching for the milk. It will look rough and dry at first, and that’s exactly what you want; the blender needs resistance to build the thick base.
Use the Smallest Amount of Milk That Lets the Blades Move
If the blender stalls, add almond milk one tablespoon at a time. Stop as soon as the mixture starts moving again. Too much liquid is what turns a bowl into a drink, and once that happens, there’s no fixing it without more frozen fruit.
Shape the Bowl Before It Melts
Pour the base into wide, shallow bowls right away. A narrow bowl makes the serving look smaller and gives the toppings nowhere to go. Work fast with the granola, berries, banana, chia, coconut, and almond butter so the surface stays neat and the base keeps its thick, scoopable texture.
How to Adapt This for Different Diets and Different Mornings
Dairy-Free Without Losing Creaminess
This bowl already leans dairy-free if you use almond milk or coconut milk. Coconut milk gives the thickest, richest result, especially if you want a more dessert-like finish, while almond milk keeps the flavor brighter and lighter.
How to Make It Without Açaí
Skip the açaí pulp or powder and add a little extra frozen banana if the blend feels loose. You’ll lose some of the deep purple color and that earthy berry note, but the bowl still tastes clean and bright, especially with a good honey drizzle on top.
Gluten-Free Toppings That Still Give Crunch
Use certified gluten-free granola if that matters for your kitchen. The crunch is what balances the soft base, so don’t skip it; if you want a different texture, toasted nuts or seeds can do the same job without changing the bowl’s structure.
Turning It Into a Bigger Breakfast
Add more almond butter, an extra spoonful of chia, or a handful of sliced fruit on top if you want it to hold you longer. The bowl gets more filling without losing its character, and the toppings still stay cleanly arranged if the base stays thick.
Storage and Reheating
- Refrigerator: This one is best eaten right away. The base softens fast and the toppings lose their contrast after about 20 to 30 minutes.
- Freezer: Not ideal once blended. If you want to get ahead, portion the frozen fruit, açaí, and banana into freezer bags and blend from frozen when you’re ready.
- Reheating: No reheating needed. If the bowl gets too firm after a few minutes in the freezer, let it sit on the counter briefly and stir before adding toppings; microwaving will melt the texture.
Questions I Get Asked About This Berry Smoothie Bowl

Coconut Lime Icebox Cake with Mango Ribbons
Ingredients
Equipment
Method
- Open the refrigerated full-fat coconut cream cans without shaking, then scoop only the solid cream from the top into a chilled bowl (discard the liquid or save for smoothies). Beat with an electric stand mixer on medium-high for 2 minutes until light and fluffy; no temperature is needed.
- Add the powdered sugar, lime zest, lime juice, and vanilla extract, then beat for 30 seconds until incorporated and smooth.
- Use a vegetable peeler to shave the mangoes into long thin ribbons, working around the pit. Set the ribbons aside on paper towels to release water while you assemble the cake.
- Spread a thin layer of coconut cream on the bottom of a 9x13 pan. Lay the graham crackers in a single layer, breaking them as needed to fill gaps.
- Spread one-third of the remaining coconut cream evenly over the crackers, reaching the edges so the layer is uniform.
- Repeat with two more layers of graham crackers and coconut cream, finishing with a cream layer on top. Smooth the surface with an offset spatula.
- Refrigerate uncovered for at least 6 hours or overnight so the graham crackers absorb moisture and soften into a cake-like texture. Keep chilled; a cake pulled at about 4 hours will still have crunch.
- Just before serving, arrange the mango ribbons in loose folds across the top, scatter the toasted shredded coconut, and finish with fresh mint leaves. Slice with a sharp knife dipped in hot water and wiped clean between cuts.